Termbase Management
Supervertaler for Trados uses the same SQLite termbase format as Supervertaler Workbench. You manage your termbases through the Settings dialogue.
Accessing termbase settings
- Click the gear icon in the TermLens panel, or go to Settings in the plugin ribbon
- Switch to the TermLens tab
Database file
The plugin stores all termbases in a single .db file (SQLite database).
- Click Browse to select an existing database file
- Click Create New to create a fresh, empty database
MultiTerm termbases
If your Trados project has MultiTerm termbases (.sdltb files) attached, they appear automatically at the bottom of the termbase list with a [MultiTerm] label and green background. These termbases are read-only in TermLens –to manage their terms, use Trados’s built-in MultiTerm interface. See MultiTerm Support for full details.
Termbase list
Once a database is loaded, the termbase list shows all Supervertaler termbases it contains, plus any detected MultiTerm termbases. Each Supervertaler termbase has three toggles:
| Toggle | Purpose |
|---|---|
| Read | Load terms from this termbase for matching in TermLens |
| Write | New terms added via quick-add shortcuts go into this termbase |
| Project | Designate as the project termbase (terms shown in pink, prioritised in matching) |
Creating a new termbase
- Click Add Termbase
- Enter a name for the termbase
- Select the source language and target language
- Click OK
The new termbase appears in the list, ready for use.
Import from TSV
You can import terminology from a tab-separated values file:
- Select the target termbase in the list
- Click Import from TSV
- Select your
.tsvfile - A column-mapping dialog opens (from v18.20.187): one row per column in the file, with a sample of its contents and a dropdown saying which termbase field it goes to. It is pre-filled from the file’s headers, so a file exported by Supervertaler needs no changes – check the row count, termbase name and language pair in the heading, and click Import. For a file with no language headers, or with the target column first, set the source and target yourself; any column you do not want goes to ignore
- A progress bar tracks the import (useful for large termbases with thousands of terms)
If the file’s languages are the other way round from the termbase, or are not its pair at all, the dialog says so in a note under the grid. The mapping it suggests already accounts for a reversed file.
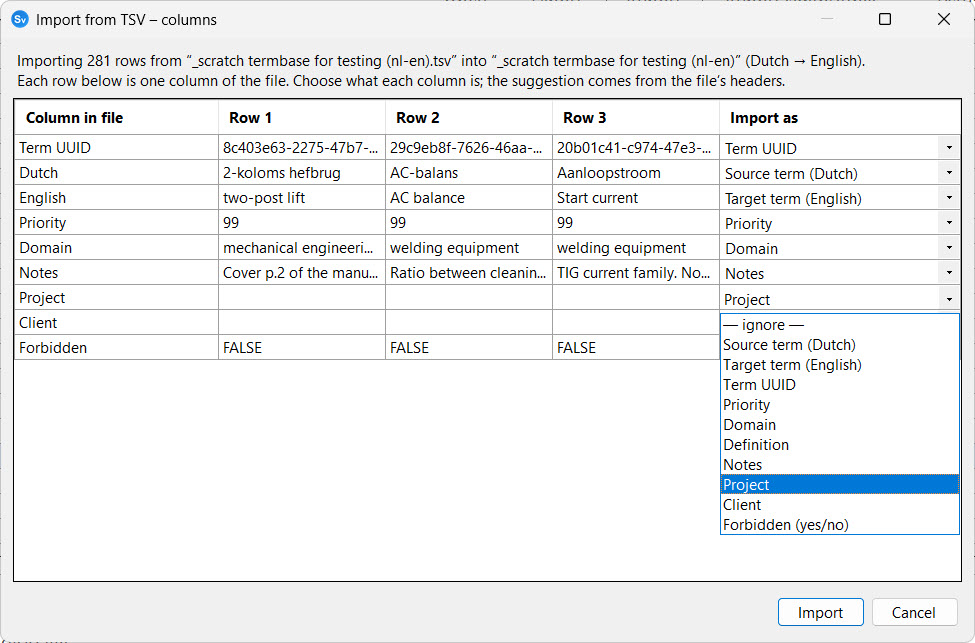
File format:
The first row must be a header row. Headers the dialog recognises on its own (case-insensitive) – anything else can still be mapped by hand:
| Column | Required | Recognised headers |
|---|---|---|
| Source | Yes | Source, Source Term, Src, or a language name (e.g., English) |
| Target | Yes | Target, Target Term, Tgt, or a language name (e.g., Dutch) |
| Term UUID | No | Term UUID, UUID, Term ID, ID |
| Priority | No | Priority, Prio, Rank |
| Domain | No | Domain, Subject, Field, Category |
| Definition | No | Definition |
| Notes | No | Notes, Note, Comment, Description |
| Project | No | Project |
| Client | No | Client, Customer |
| Forbidden | No | Forbidden, Do not use |
For terms with multiple synonyms, use pipe-delimited values: main|synonym1|synonym2. Forbidden synonyms are wrapped as [!term].
Example:
Source Target Domain Notesdatabase databank|gegevensbanksoftware software Non-translatableuser interface gebruikersinterface|gebruikersomgeving ITExport
To export all terms from a termbase:
- Select the termbase in the list
- Click Export
- Pick the format in the save dialog, then choose a location
Three formats, for three different purposes.
TSV – the one that comes back unchanged
Tab-separated columns with a header row: Term UUID, Source, Target, Priority, Domain, Notes, Project, Client, Forbidden. Synonyms are pipe-delimited and forbidden synonyms are marked with [!term]. UTF-8 with BOM, for Excel compatibility.
Use it for a backup, for editing in a spreadsheet, or for moving terms between Supervertaler termbases – it reimports here with nothing lost.
MultiTerm XML – for Trados
The format MultiTerm and Glossary Converter import. This is how you get terms out of Supervertaler and into a Trados termbase:
- For a
.sdltb: convert the XML with Glossary Converter, or import it in MultiTerm. - For a
.ttb(Studio 2026): in Studio’s Termbases view, create a termbase and use Import Terms.
Carries source and target terms with their synonyms, plus definition, domain, notes, context, part of speech, URL, client, project and the forbidden flag – more than the TSV export, which has no column for several of those.
TBX – for everything else
TBX-Basic (ISO 30042), the standard interchange format. MultiTerm reads it and so do most other CAT tools, so it is the better choice if your terminology has to travel beyond Trados.
What a round trip keeps, and what it doesn’t
Terms, synonyms and the descriptive fields survive a full circle out to a Trados termbase and back. The structure does not: a MultiTerm entry is concept-oriented and can hold many languages, while a Supervertaler termbase is bilingual rows – so one conversion handles one language pair, and concepts flatten to pairs with any extra terms in a language becoming synonyms.
Import from a Trados termbase
Import .sdltb/.ttb… copies terms out of a Trados termbase and into a Supervertaler one. You choose the language pair, whether to create a new Supervertaler termbase or add to an existing one, and which of the Trados descriptive fields map to definition, domain, notes and so on.
The Trados termbase is only ever read, never modified.
An AI assistant connected through the MCP server can do the same in one step with import_project_termbase, including a dry run that reports what would be imported before anything is written.
Termbase Editor
For full editing capabilities, double-click a termbase in the list to open the Termbase Editor. From here you can:
- Search for terms by source or target text
- Edit individual term entries
- Delete terms
- Perform bulk operations (e.g. bulk delete, bulk reverse)
Right-click menu
Right-clicking any row in the grid opens a context menu with the following actions:
- Copy cell – copies the content of the clicked cell to the clipboard.
- Edit term… – opens the full term entry editor for the clicked row.
- Reverse source/target – swaps the source and target for the selected rows (see below).
- Delete term – deletes the selected rows after confirmation.
Multi-row selection is preserved: if you select several rows first and then right-click on one of them, the selection stays intact so actions apply to all selected entries. If you right-click on a row that wasn’t already selected, the selection collapses to just that row.
Reversing source/target
If you have term entries that ended up in the wrong direction – for example, English text in the Dutch column when the termbase is declared English → Dutch – you can correct them with Reverse source/target:
- Select one or more rows in the grid (Shift-click or Ctrl-click for multi-select).
- Right-click → Reverse source/target (N entries).
- Confirm.
The operation swaps the source and target text, language tags, abbreviations, and flips the direction of every linked synonym. It runs in a single database transaction, so a partial failure leaves the termbase untouched.
This action is mostly for repairing legacy entries created or edited under v4.19.24 or earlier, when the term entry editor could write values into the wrong DB columns in projects whose direction was the inverse of the termbase’s. From v4.19.25 onwards the editor guards against that, so new entries should not need this repair.